

- What is Talent tree in Dota?
- How many trees are there in Dota?
- How many trees are there in the map?
- More articles
- Contents
- Height brush mouse operations
- Selecting the current current tile set
- Raise Height vs. Add Height
- Tile grid height
- Water brush mouse operations
- Water and trees
- Path brush mouse operations
- Tree brush mouse operations
- Changing the tree type
- Valid tree locations
- Plant brush mouse operations
- Changing the plant type
- Blend Painting Brush
- Painting blend layers
- Painting layer transitions
- Erasing all blending
- Painting color tint
- Material Sets and Transitions
- Applying Material Sets
- Transition Material Sets
- Object position grid
- Object placement mouse operations
- Selecting the object type
- Changing the variation of an object
- Moving and cloning objects
- Copy and paste
- Managing Tile Sets
What is Talent tree in Dota?
The Talent Tree is a series of selectable talents a hero can choose. Talents offer a wide variety of options for heroes, from additional stats to abilities that are difficult or impossible to obtain otherwise, such as reducing respawn time or increasing passive gold gain.
How many trees are there in Dota?
There are currently «2107» trees in the Dota 2 map.
How many trees are there in the map?
According to the latest research, the total number of trees in the world is 3.041 trillion (that’s 3,041,000,000,000). The revised number is almost eight times more than the previous estimate of 400 billion trees.
You know that there is not such hero in Dota 2 than Timbersaw, who «hates» trees more than any other hero in the game. So, he cut down the most trees in Dota — more than 1 million+.
Mars’ ultimate destroys the most trees in one ability cast. Over 80 trees can be cut down with Arena of Blood. Batrider was second in this indicator, which can burn almost 60 trees in one use of the Firefly ability. Timbersaw, the game’s prominent lore hater of trees, took third place — his Flamethrower spell from Aghanim’s Shard destroys over 50 trees in one go.
Moreover, the fan made the same item chart. The most effective artifacts for destroying trees in one use were Force Boots, Fallen Sky and Force Staff.
More articles
New rank-up system in CS:GO
A month ago, a new update was released in CS:GO, which changed the rank-up system. Someone’s rank went down by two ranks, and someone’s increased. Someone instantly received the Global Elite rank, although this player never had such a rank. At that time, everyone was stripped of their titles, and players needed to win one game to regain their titles. All the magic happening now with the rank-up system is very interesting. Today you will learn how the new promotion system works at different ranks.
Functions in CS:GO deleted by Valve
Legion Commander Dota TI10 cosplay
Buyback mechanics — cheat death concept or not
Buyback (BB) – is a mechanic that allows you to avoid death pause time and return to the active game. Buyback is the same fundamental option in Dota, like Roshan, Aegis, or BKB against a tremendous amount of magic spells. B B’s formula hasn’t changed in the same way for the last 3-4 patches. At the same time, there is very little information on how to BB correctly. As a result, mucho low-ranked players don’t even think about the importance of BB, even in early games. Otherwise, 5-6k pts doters mindlessly leave buybacks even when they don’t need them. These mechanics have too many subtleties, but we will try to understand and structure the knowledge.
How to shoot like a PRO
Do you know how to make 5 headshots in a row using «spray» or «burst» shooting style? Shooting depends on many factors that affect the outcome of the entire game. So, it is influenced by your internal state, how much you rested, how healthy you are, as well as psychological stability. The «devices» play an equally important role, as well as the types of shooting.
TOP-5 «DIRTIEST» CHEATERS IN PRO DOTA
Notes about performance costs and possible optimizations to consider when building custom maps.
Contents
Most entities in Source are networked and send their state to the server so clients don’t fall out of sync with one another. To optimize this the «_clientside» entity type exists to reduce network traffic and is primarily used on cosmetic non-gameplay affecting entities.
A good example of this is all of the ambient creatures in Dota 2 are placed using the «prop_dynamic_clientside» entity. These do not send their state to the server. Each client may see them at different times, but they have no effect on gameplay.
If the entity’s state was important to the gameplay a regular prop_dynamic should be used instead.
Trees placed using ent_dota_tree create destructible trees that will snap to 64 grid increments to keep them aligned to the navigation grid. Placing numerous trees inside a 64×64 grid square will often have them snap to the same location, resulting in a number of trees overlapping in the exact same location. This is bad. A good way to avoid this is placing any «ent_dota_tree» on a minimum of a 64 grid square to keep the tree from ending up in an unexpected spot at run time.
Note:The Tile Editor takes this into account and will not allow any painted trees to overlap.
There is a limit of trees on map: 4096. No matter how you created it, with spray tools or through tile set editor.
When adding deferred point lights to custom maps be aware of overlapping a number of them will cause a hit to performance. A good tool to use when evaluating performance is «r_deferred_simple_light 2» which will display a point light’s radius in game with some color information. If the color shifts to green as more and more lights overlap then there is a significant amount of overdraw caused by having a number of lights in the same space. Reduce the number of overlapping light radii to reduce overdraw.
From Valve Developer Community
Jump to: navigation, search
Dota 2 uses many entities and this page want to document these as well as their usage.
These entities are necessary to run a map.
List in no particular order — they’re all needed:
Without this entity, your Dota will instantly crash. No data required.
Specifies the total size of your map. Max Bound is filled with two positive valuesMin Bound is filled with two negative values
Functionbridge to control different events (soundques, animations) on script-events. Not data required.
Controls the whole lightning and can be used to change the lightning for different sides on the map. Ambient Day ColorAmbient Night ColorAmbient Direction DayAmbient Directeion NightAmbient Scale DayAmbient Scale NightDay ColorNight ColorFog Color DayFog Color NightFog End Day ‘Value:’ 3000 — Sets your FogdistanceFog End Night ‘Value:’ 3000 — sets your FogdistanceFog Height DayFog Height NightFog Height Color DayFog Height Color NightFog Start Day ‘Value:’ 1500Fog Start Night ‘Value:’ 1500Fog of War Color Blue Day ‘Value:’ 4Fog of War Color Blue Night ‘Value:’ 4Fog of War Color Green Day ‘Value:’ 3Fog of War Color Green Night ‘Value:’ 3Fog of War Color Red Day ‘Value:’ 2Fog of War Color Red Night ‘Value:’ 2Fog of War Darkness Day ‘Value:’ 2.7Fog of War Darkness Night ‘Value:’ 2.7Inner Radius Value: 3500Light Direction Day Value: 43 313 0Light Direction Night Value: 43 313 0Outer Radius Value: 11000Shadow Color DayShadow Color NightShadow Ground Scale Day Value: .2Shadow Ground Scale Night Value: .25Shadow Scale Day Value: .2Shadow Scale Night Value: .25Specular Color DaySpecular Color Night
Lightning entity — controls cloud-shadowing as well.cloud1speed Value: 120specularcolor Value: 165 161 255cloud2direction Value: 0 145 0specularangles Value: 60 270 0cloud2speed Value: 80cloudscale Value: 65000groundscale Value: 15Start Disbled Value: NoLight ColorColor Transition Time Value: 0.5Distance Value: 10000FOV Value: 5NearZ Distance Value: 4North Offset Value: 200Texture Name Value: effects/blank_clouds_00Enable Shadows Value: Yes
Max Ragdoll Count Value: -1Max Ragdoll Count DX8 Value -1
Start Transition to Cheap Water Value: 10000Start Transition to Cheap Water Value: 20000
Name Value: tonemapcontroller
Map based scripting entitity. See tutorial-maps for reference, but note that the tutorial maps also have the tutorial logic scripting system running on top which handles a lot of the events.
Spawnboxes for Radiant
Spawnboxes for Dire
You will need at least one Skybox and one displaced brush in order to make a functioning map.
Spawnbox for players in custom games
These entities are tied to the gamemechanics, such as runes.
This entity spawns runes on given grid point. It is cruical to fill in ‘Name’ with ‘dota_item_rune_spawner’ in order to fully work. Without given name it doesn’t spawn runes.
This section explains the features of Tile Editor in detail. If you just want to learn the basics, go read Tile Editor Basics: Your First Dota Map.
The tile editor tool interface is split into 3 main sections, as pictured below:
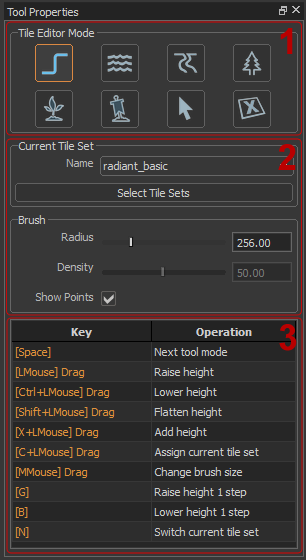
Tool mode hotkey:
The height brush mode of the tile editor allows the height of the ground within the radius of the brush to be raised and lowered. There are a few modifiers that change exactly how the brush affects ground height, these are described below.
Height brush mouse operations
You can change the radius of the brush by using middle mouse drag or by using the slider in the brush settings interface.
Note:The radius for each of the brush modes can be adjusted in the same way, but each mode stores its own radius setting.
Selecting the current current tile set
Note:The hotkey can be used to quickly cycle the active tile set
Once a tile set is selected, any of the height brush operations will change the tiles within the brush to be the currently selected tile set. The Assign current tile set operation + can be used to change the tile set assigned to tiles within the brush without modifying the ground height.
Raise Height vs. Add Height
Most of the height brush operations are straightforward, but there is a subtle distinction between Raise Height () and Add Height (+). Raise Height will increase the height of the ground directly under the cursor at the start of the brush stroke by one step and then set the height of all other ground positions within the brush to the same height regardless of their initial heights. By contrast, Add Height raises the height of each ground position within the brush by one unit from from that position’s original height at the start of the brush stroke. As a result Raise Height will tend to create plateaus with large elevated flat areas, while Add height will tend to create hills with few flat areas.
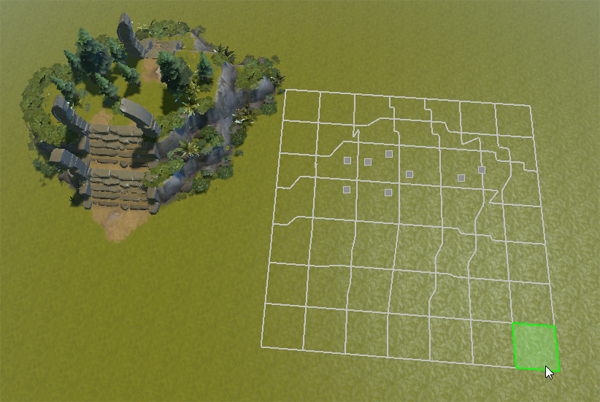
Tile grid height
The tile editor editor will allow the height of the ground to be raised 15 steps above or below the initial ground plane height. Once this limit is reached operations which modify the ground height will no longer apply to any ground points which have reached the maximum or minimum height. Each height step is of the ground is equivalent to 128 game units.
The water brush tool mode allows water to be placed in a map using the same brush interface that is used to paint ground height. Water is primarly a visual element, other than modifying the height of the ground it has no significant impact in game.
Water brush mouse operations
Using the water brush will result in modifying the ground height such that the ground under the water is flat and so that the water is surrounded by a border of ground tiles that are exactly one step higher than the water. This means that water cannot directly touch a tile with a height change greater than a single step (128 units).
Tip: A single map may have water at multiple levels, but each visible level of water requires its own reflection rendering. The more levels of water are visible at once, the slower the map will run. For best in game performance a map should be constructed such that there is only one level of water visible at a time in game.
Water and trees
Trees may be placed in water, however using the water brush will remove trees automatically as this is generally the desired result. Trees may be placed in water after it is created by the water brush.
Path brush mouse operations
Unlike the height and water which modify tile corners, the path brush modifies tile edges, marking each tile edge as being on a path or not. By default when using the path brush, blue lines are drawn connecting the any two edges of a tile which are marked as being on a path. This is useful in when trying to distinguish between two parallel paths and a single wider path.
The tree brush tool mode allow trees to be added to the map at the valid tree locations within the radius of the brush. The type of tree to be added can be selected from the set of tree types provided by the currently active tile set and the density of trees placed can be controlled as well.
Tree brush mouse operations
The density of trees placed by the brush can be modified by using the density slider in the interface or by holding control and using middle mouse drag . A lower density will result in fewer trees being added within the radius of the brush, while a higher density will result in more trees being added within the radius of the brush.
Changing the tree type
The type of trees placed by the tree brush can be picked from any of the tree types provided by the currently selected tile set. Simply select the tree type from the trees drop down in the settings interface for the tree brush.
Note:The type of tree being placed is dependent completely on the setting in the interface, not the tile set assigned to the ground where it is being placed. This allows mixing trees from different tile sets.
Valid tree locations
Tree placement is restricted to a 64 unit grid. Only one tree may occupy each location and a location is only valid for tree placement if it is not on a slope. Additionally a tree may not be placed on a location which already has a tree on a neighboring location. These restrictions are due to the fact that trees are important to gameplay and affect both navigation and fog of war. By placing trees using the tile editor you are guaranteed that each is placed in a valid location.
The plant brush tool mode allows placing plants and other details in much the same way as the tree brush. Like trees plants are restricted to a 64 unit grid with only one plant allowed to occupy each location. Like trees plants cannot be placed on slopes, however unlike trees there are no neighbor restrictions on plants. Unlike trees plants are purely a visual detail and do not affect on gameplay.
Plant brush mouse operations
Like trees, the density of plants placed by the brush can be modified by using the density slider in the interface or by holding control and using middle mouse drag . A lower density will result in fewer plants being added within the radius of the brush, while a higher density will result in more plants being added within the radius of the brush.
Changing the plant type
The type of plant which that is placed can be modified by selecting the plant type drop down from the settings interface for the plant brush. By default the plant type will be set to random, meaning that any of the available types can be placed within a single brush stroke. It can be changed to a specific type so that only plants of the selected type will be placed. Like the tree types, the active tile set determines what the available plant types are, but in general the standard tile sets simply provide sparse, moderate and thick plant types, which essentially control the size of the plants.
Blend Painting Brush
The blend painting brush performs modification of texture blending directly within the tile editor. This allows texture blends on tiles to be modified without having to first collapse the tiles.
A section of the Dota 2 map with and without blend painting.
Painting blend layers
There are four blend layers which can be painted with the blend paint brush. The appearance of each layer is dependent on the tile set, but the layers are always ordered from 1 to 4 such that layer 1 is the bottom layer and layer 4 is the top layer.
To paint a layer select the corresponding button from the UI.
Once a layer is selected, left click and drag to paint the selected layer within the radius of the brush.
Hold control and left click and drag + to erase the current layer, revealing the layers below it.
The brush settings can be used to control exactly how the brush modifies the opacity of a layer.
Painting layer transitions
Using the Transition mode, the transition between two layers can be modified to be either sharp or soft, although the exact result is dependent on each layer of the material.
Note:The transition paint mode can also be accessed by holding shift when painting any of the blend layers.
Using the Smooth mode, blend painting authored using the brush for any layer can be smoothed to make blend more even and gradual.
This is different than making the transition soft in that it actually modifies the painted opacity of the layer instead of just modifying how the opacity is interpreted.
Left click and drag to smooth the blends within the radius of the brush.
Erasing all blending
Using the Erase All mode, all blend painting can be completely erased to return the surface to its original unpainted state.
Left click and drag to erase all blends in the area within the brush.
Painting color tint
Using the Color mode, a color tint can be applied on top of any existing blends. The color to be applied can be selected by clicking on the color swatch.
Left click and drag to paint the selected color tint.
Material Sets and Transitions
Material sets are groups of materials that can replace the default materials on a tile. Each tile set may have a number of different material sets which allow the original materials to be be replaced without requiring a whole new tile set.
Applying Material Sets
To apply a material set first select the material set from the drop down in the ui.
Once the material set is selected you can assign it to tiles using the blend paint brush modifier +
This will cause the selected material set to be assigned to the tile within the radius of the brush.
After a material set has been applied to tiles you can paint any of the four blend layers.
Note:Some blend layers may match other material sets while others may not. The matching layers can be used to hide the edges.
Transition Material Sets
Transition materials set are a special type of material set which may be used to blend between two other material sets.
To use a transition material set, first select it from the material set drop down:
Just as with a normal material set, use the brush while holding the apply material set modifier + to apply the transition material set.
Transition materials only support blending layers 1 and 3 because they contain layers 1 and 3 from the two materials they transition between.
However, in addition to layers 1 and 3, transition material sets support the ‘Material Transition’ layer. This layer controls the blending between the two pairs of layers.
To paint the transition select the ‘Material Transition’ button from the ui.
Then simply use the brush to apply the transition by holding and dragging or holding + to erase the transition blend.
The object placement tool mode can be used to add individual detail objects to the map as well as individual trees and plants. In addition to placing detail objects the object placement tool can also be used to make small tweaks to existing objects such as rotating and re-positioning.
Object position grid
Unlike the brush tools which work on an area, the object placement tool works on a single object at a time. The object placement tool interacts with the object position grid, which is the grid of locations 64 units apart where objects can be placed. When the object placement tool is active it will show the object location grid points in an area around the cursor. The grid point nearest the cursor will be highlighted in green, this is the active grid point to which all operations and commands will apply.
Object placement mouse operations
The primary function of the object placement tool is to place detail objects. This is accomplished by simply moving the mouse cursor over a free object location grid point (free points are white), and clicking on it with the left mouse button. This will place an instance of the currently selected object type on the active grid point.
Selecting the object type
The object placement tool can place three types of objects: props, trees, and plants. To select which type of object that will be placed simply select the type from the object type dropdown in the tile editor interface.
Once a general object type has been selected, a specific sub-type of that object can also be selected from the interface.
Each object sub-type may still have multiple variations, when placed one of these variations will be selected randomly.
Changing the variation of an object
The specific variation of any object can be modified by mousing over the object location and pressing or .
Note:Some objects may have only one variation, in which case the object will not be modified.
Moving and cloning objects
To rotate an object, move the cursor over the grid point location where the object is placed, then hold x and left click and drag + or middle click and drag . This will rotate the object. The rotation will obey the rotation snap settings, these can be set using the snapping toolbar in the lower right hand corner of the Hammer window.
To remove an existing object simply hold control and left click + on the grid point corresponding to the object, or with the mouse cursor over the grid point for the object press .
Note:While holding control any location which has an object will turn red to indicate that it can be removed.
In addition to editing props, the object placement tool can be used to edit trees and plants, even if they were placed with the tree or plant brush tool modes.
Note:Left clicking on a tree has the special behavior of modifying the height of the tree
The item selection tool allows selection of both tiles and objects simultaneously. It then supports several operations that work on the selected set of items.
There are a few method of selecting items:
All selection operations can be modified in the same way:
By default the selection tool mode will select both tiles and objects. The selection filter in the selection tool mode settings interface can be used to disable selection of either, allowing only the other to be selected. This can be useful in making complex selections.
Note:The going to the next variation and then the previous variation may not yield the exact same result because the detail components may still differ.
Collapsing items creates an editable copy of the selected items which can be modified individually outside of the tile editor. This is useful if custom modifications are needed.
Note:This operation will exit the tile editor and select the resulting objects.
Tiles and objects are frequently composed of several detail components. When a tile or object is selected a gray box will drawn at the origin of each of its detail components. Moving the mouse cursor over one of these boxes will change the green selection highlight to be only on the specific detail component.
Copy and paste
Any selection of tiles and objects can be copied and pasted while in the item selection tool mode.
Pressing ++ activates a preview mode showing the selection on the clipboard before actually pasting it to the selected location.
The enable disable tool mode allows tiles to be disabled or re-enabled. Disabling a tile is a way of hiding a tile in a non-destructive mangger. This can be useful when authoring custom geometry and embedding it in the tile grid.
Note:Only tiles can be disabled, objects (such as trees) will be hidden if they are on a disabled tile. Objects which are on the corners or edges of tiles will only be hidden once all of the tiles they touch are disabled.
To disable a tile simply enter the enable disable tool mode and click on the tile. The tile will immediately gray out. When switching back to any of the other modes of the tile editor the disabled tile will be hidden.
Any disabled tile can by re-enabled by entering the enable disable tool mode. When in this mode all disabled tiles which are normally hidden will be visible but will draw grayed out. Clicking on any grayed out tile will re-enable it, causing it to draw normally.
Managing Tile Sets
A tile grid may reference up to 4 different tile set maps. These are the tile sets which can be selected as the current tile set. To change, add or remove which tile sets are being used simply click the Select Tile Sets button in the tile editor interface.
This will bring up the properties dialog for the tile grid, which lists the four tile set map files the tile grid is using. To change any of the tile sets click on the magnifying glass icon to bring up an asset browser which will allow you to pick a new tile set map. Picking a new tile set map to replace an existing map will automatically replace all of the tiles currently in use with the ones from the new map.
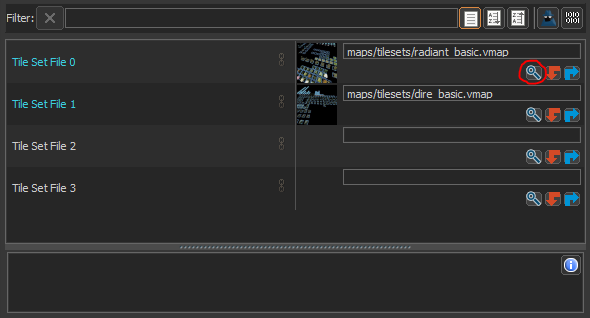
Tip: To remove a reference to a tile set that is not in use, clear the name entry for that tile set. Removing un-used tile sets will actually decrease the amount of time it takes to load the map in Hammer as each referenced tile set is loaded completely regardless of how many tiles are using it.
Next: New Tilesets


